Raspberry Pi + Ubuntu + .NET Core で GPIO「Part1 OS 環境構築」
SD カードの準備
使用した OS イメージは Raspberry Pi 用の Ubuntu Server 22.04 LTS ubuntu-22.04-preinstalled-server-arm64+raspi.img.xz
ここから入手します。
https://ubuntu.com/download/raspberry-pi
書き込みは Raspberry Pi Imager
ここから入手します。
https://www.raspberrypi.org/software/
OS の構成
日本語キーボードレイアウト
以下のコマンドでツールを起動して
$ sudo dpkg-reconfigure keyboard-configuration
以下の順に選択していきます。
Generic 105-key PC
Japanese
Japanese
The default for the keyboard layout
No compose key
しばらく待って
$ sudo reboot
Wi-Fi 接続
/etc/netplan/ に設定ファイルを追加します。
$ sudo vi /etc/netplan/99-network-config.yaml
中身は以下のようなかんじ。
network:
    wifis:
      wlan0:
        optional: true
        dhcp4: true
        access-points:
          "MySSID":
            password: "PassW0rd!"
    version: 2
変更を反映します。
$ sudo netplan apply
IP アドレスの割り当てなどを確認します。
$ ip address show
諸々の更新
これはお決まりですね。
$ sudo apt update
$ sudo apt upgrade
ツール類
raspi-config
raspi-config をインストールします。以下のサイトを参考にさせて頂きました。
Raspberry Pi 4B を自宅 (Ubuntu) サーバにする - yamk blog
$ sudo su -
# echo "deb http://archive.raspberrypi.org/debian/ buster main" >> /etc/apt/sources.list
# apt-key adv --keyserver hkp://keyserver.ubuntu.com:80 --recv-keys 7FA3303E
# apt update
# apt install raspi-config
# exit
$
raspi-config で I2C の ON/OFF などの設定ができるらしいです。
i2c-tools
i2c-tools をインストールします。
$ sudo apt install i2c-tools
このように、接続を確認できて便利っぽいです。
$ sudo i2cdetect -y 1
     0  1  2  3  4  5  6  7  8  9  a  b  c  d  e  f
00:          -- -- -- -- -- -- -- -- -- -- -- -- --
10: -- -- -- -- -- -- -- -- -- -- -- -- -- -- -- --
20: -- -- -- -- -- -- -- -- -- -- -- -- -- -- -- --
30: -- -- -- -- -- -- -- -- -- -- -- -- 3c -- -- --
40: -- -- -- -- -- -- -- -- -- -- -- -- -- -- -- --
50: -- -- -- -- -- -- -- -- -- -- -- -- 5c -- -- --
60: -- -- -- -- -- -- -- -- -- -- -- -- -- -- -- --
70: -- -- -- -- -- -- -- --
ASP.NET Core Runtime
インストール
ランタイムの
.tar.gzファイル を公式サイトから入手します。- x86-64 システムでは可能な
aptによる方式は、現時点で ARM64 非対応 - ここで使用したのは以下のファイル
aspnetcore-runtime-6.0.7-linux-arm64.tar.gz
- x86-64 システムでは可能な
お好きなインストール先へ展開します。
$ sudo mkdir -p /bin/dotnet6
$ sudo tar zxf aspnetcore-runtime-6.0.7-linux-arm64.tar.gz -C /bin/dotnet6
環境設定
システムへのパス設定
/etc/profile.d内にexport-dotnet.shファイルを新規作成します。
export DOTNET_ROOT=/bin/dotnet6
export PATH=$PATH:$DOTNET_ROOT
- 再起動。
$ sudo reboot
- 確認。
$ dotnet --info

global.json file:
  Not found

Host:
  Version:      6.0.7
  Architecture: arm64
  Commit:       0ec02c8c96

.NET SDKs installed:
  No SDKs were found.

.NET runtimes installed:
  Microsoft.AspNetCore.App 6.0.7 [/usr/bin/dotnet6/shared/Microsoft.AspNetCore.App]
  Microsoft.NETCore.App 6.0.7 [/usr/bin/dotnet6/shared/Microsoft.NETCore.App]

Download .NET:
  https://aka.ms/dotnet-download

Learn about .NET Runtimes and SDKs:
  https://aka.ms/dotnet/runtimes-sdk-info
sudo のパス設定
sudoのときもパスが通るようにするため、/etc/sudoersのsecure_pathにパスを書き加えます。/etc/sudoersを破壊するとたいへんな事になるのでvisudoを使うらしいです。
$ sudo visudo
/bin/dotnet6を書き加えています。
Defaults secure_path="/usr/local/sbin:/usr/local/bin:/usr/sbin:/usr/bin:/sbin:/bin:/snap/bin:/bin/dotnet6"
- 確認。
$ sudo dotnet --info

global.json file:
  Not found

...省略...
HC-SR501 赤外線感応モジュール
![HiLetgo® 3個セット HC-SR501人体赤外線感応モジュール 人体の赤外線の感応器 [並行輸入品]](https://m.media-amazon.com/images/I/41rIDiJLWLL._SL500_.jpg "HiLetgo® 3個セット HC-SR501人体赤外線感応モジュール 人体の赤外線の感応器 [並行輸入品]")
データシート
https://www.mpja.com/download/31227sc.pdf
外観


I/O
- VCC
- 4.5~20V
- OUT
- トリガー中 3.3V
- 非トリガー 0V
動作
トリガー
- 赤外線を感知するとトリガー状態に遷移
- トリガーの終了パターンは Jumper 設定により異なる
ブロッキングタイム
- トリガー終了から次のトリガーまで2.5秒の待機時間があり、この間は感知しない
- 設定可能と書いてあるが、設定方法は???
設定
Jumper 設定
- H: Repeat Trigger
- トリガー中に赤外線を感知すると、トリガー時間を延長する
- 時間延長は、単純に0から再カウント
- L: Single Trigger
- 一度トリガーすると、設定時間経過後にいったん終了する
- トリガー中の赤外線感知は無視
感度ボリューム
- 写真左のボリュームで設定(左回転マイナス/右回転プラス)
- おおよそ 3m~7m の範囲
トリガー時間ボリューム
- 写真右のボリュームで設定(左回転マイナス/右回転プラス)
- 5秒~300秒
拡張
フォトレジスタの増設により、暗いときにのみトリガーするように構成可能
30個のフォトレジスタLDRフォトライト依存抵抗性5ミリメートル")

モバイルバッテリーの電力移動効率を調べてみた
タブレットの電池を消費した状態から充電開始。モバイルバッテリーが力尽きるまで充電し、増加分を計測します。
※厳密な測定ではないので、参考程度にお考えください。
受電側
Wi-Fi11.5型ワイド有機EL & 8コアプロセッサ搭載 大画面・高画質プレミアムタブレット PC-T1195BAS")
給電側
① RAVPower モバイルバッテリー 10000mAh

結果
15% → 85%
= +70%
= +5880mAh
= 58.8%
② Anker PowerCore 10000 PD Redux
【PSE技術基準適合 / Power Delivery対応 /低電流モード搭載】 iPhone & Android 各種対応x(モバイルバッテリー 10000mAh 大容量)【PSE認証済 / Power Delivery対応 /低電流モード搭載】 iPhone & Android 各種対応")
結果
11% → 88%
= +77%
= +6468mAh
= 64.68%


Azure Functions を DI ベースに構成するテンプレ
Azure Functions を DI ベースに構成します。
.NET Core で環境変数や設定値の読み込みが、なんだか面倒になったところも解消します。
DI 構成
以下の NuGet パッケージを利用します。 www.nuget.org
FunctionsStartup を構成します。
DI の代表的存在であろう HttpClientFactory を組み込んでみます。
/* Startup.cs */
using Microsoft.Azure.Functions.Extensions.DependencyInjection;
using Microsoft.Extensions.Configuration;
using Microsoft.Extensions.DependencyInjection;

[assembly: FunctionsStartup(typeof(MyNamespace.Startup))]

namespace MyNamespace
{
    public class Startup : FunctionsStartup
    {
        public override void Configure(IFunctionsHostBuilder builder)
        {
            // HttpClientFactory
            builder.Services.AddHttpClient();

            // Scope 実験のためのオブジェクト(後述)
            builder.Services.AddScoped<DisposableObject>();

            // 環境変数の読み込み(後述)
            builder.Services.AddOptions<FunctionHttpOptions>()
                   .Configure<IConfiguration>(
                       (options, config) =>
                       {
                           config.GetSection("MyOptions").Bind(options);
                       });
        }
    }
}
環境変数、設定値
GenericHost に準拠した構成なので IOptions を利用できます。 ただ、Azure Functions の実行環境は、標準的な .NET Core App で行われる構造化された JSON ファイルとバインドするような形式ではありません。(実行環境に設定ファイルを配置しません。)
Azure Portal での設定はこのようになります。
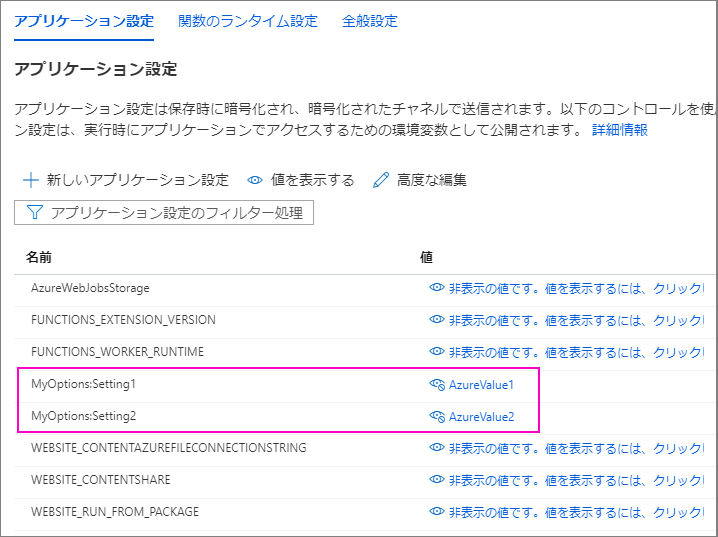
開発環境の local.settings.json での記述は以下のようになります。
{
  "IsEncrypted": false,
  "Values": {
    "AzureWebJobsStorage": "DefaultEndpointsProtocol=https;AccountName=...",
    "FUNCTIONS_WORKER_RUNTIME": "dotnet",
    "MyOptions:Setting1": "Value1",
    "MyOptions:Setting2": "Value2"
  }
}
IOptions<T> で変数を受け取る型は以下のように定義します。
public class FunctionHttpOptions
{
    public string Setting1 { get; set; }
    public string Setting2 { get; set; }
}
このような設定値が Startup.Configure() 内の記述により IOptions<FunctionHttpOptions> にバインドされます。
.GetSection("MyOptions") ではプレフィックスで値を選別しています。
HttpTrigger
DI するために class から static は外しておきます。
public class FunctionHttp
{
    private readonly IHttpClientFactory _httpClientFactory;
    private readonly IConfiguration _configuration;
    private readonly IOptions<FunctionHttpOptions> _options;
    private readonly DisposableObject _disposableObject;

    public FunctionHttp(
        IHttpClientFactory httpClientFactory,
        IConfiguration configuration,  // IConfiguration で設定値すべてにアクセス
        IOptions<FunctionHttpOptions> options,
        DisposableObject disposableObject)
    {
        _httpClientFactory = httpClientFactory;
        _configuration = configuration;
        _options = options;
        _disposableObject = disposableObject;

        Debug.WriteLine($"FunctionHttp");
    }

    [FunctionName("FunctionHttp")]
    public async Task<IActionResult> Run(
        [HttpTrigger(AuthorizationLevel.Function, "get", Route = null)] HttpRequest request,
        [Queue("myqueue-items", Connection = "AzureWebJobsStorage")] CloudQueue queue,
        ILogger log)
    {
        log.LogInformation("C# HTTP trigger function processed a request.");

        // 設定値の利用
        log.LogInformation($"FunctionHttp");
        log.LogInformation($"  Setting1={_options?.Value.Setting1}");
        log.LogInformation($"  Setting2={_options?.Value.Setting2}");
        log.LogInformation($"  AzureWebJobsStorage={_configuration["AzureWebJobsStorage"]}");

        string name = request.Query["name"];
        var responseMessage = string.IsNullOrEmpty(name)
            ? "This HTTP triggered function executed successfully. Pass a name in the query string or in the request body for a personalized response."
            : $"Hello, {name}. This HTTP triggered function executed successfully.";

        // QueueTrigger 起動のためにメッセージを送る (後述)
        await queue.AddMessageAsync(new CloudQueueMessage(responseMessage));

        return new OkObjectResult(responseMessage);
    }
}
QueueTrigger
QueueTrigger でもちゃんと DI を使えます。 static を外しておくだけです。
public class FunctionQueue
{
    private readonly IHttpClientFactory _httpClientFactory;
    private readonly DisposableObject _disposableObject;


    public FunctionQueue(
        IHttpClientFactory httpClientFactory,
        DisposableObject disposableObject)
    {
        _httpClientFactory = httpClientFactory;
        _disposableObject = disposableObject;

        Debug.WriteLine($"FunctionQueue");
    }

    [FunctionName("FunctionQueue")]
    public void Run(
        [QueueTrigger("myqueue-items", Connection = "AzureWebJobsStorage")] string myQueueItem,
        ILogger log)
    {
        log.LogInformation($"C# Queue trigger function processed: {myQueueItem}");
    }
}
Scope
DI コンテナのスコープ管理も利用されています。挙動を見るために DisposableObject を スコープ内で共有されるように仕込んでいました。
実装は以下の様に簡単なものです。
public class DisposableObject : IDisposable
{
    private readonly Guid  _id = Guid.NewGuid();


    public DisposableObject()
    {
        Debug.WriteLine($"Instantiate DisposableImpl: {_id}");
    }

    public void Dispose()
    {
        Debug.WriteLine($"Dispose DisposableImpl: {_id}");
    }
}
ログ出力は
Instantiate DisposableImpl: 2344ec50-c701-481a-9297-230e5ac3b201
FunctionHttp
  Setting1=Value1
  Setting2=Value2
Dispose DisposableImpl: 2344ec50-c701-481a-9297-230e5ac3b201
...
...
...
Instantiate DisposableImpl: c3a4c3eb-1e90-4cb2-a8aa-6d584528003c
FunctionQueue
  Setting1=Value1
  Setting2=Value2
Dispose DisposableImpl: c3a4c3eb-1e90-4cb2-a8aa-6d584528003c
となっており、メソッド実行毎にスコープが分けられている事が確認できます。
検証環境
- Azure Functions v3
- .NET Core 3.1
参考リンク
GitHub - shibayan/azure-functions-http-api: HTTP API Extensions for Azure Functions v3
.NET Azure Functions で依存関係の挿入を使用する | Microsoft Docs
ASP.NET Core のオプション パターン | Microsoft Docs